Monday, August 23, 2010

Garage Sale Score

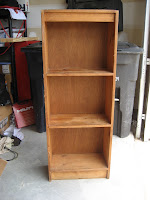
I love trolling garage sales, looking for some sad little thing, and transforming it into something beautiful.  On a recent garage sale expedition, I found this sad little shelving unit for $2.  It had stains and water marks on all the shelves, crayon and pencil marks on the sides, scratches and dents all over it, and it was BEAUTIFUL!  Well, at least in my mind's eye, it was beautiful...
 Here is a closeup of some of the stains on one of the shelves.  I tried to get some of the crayon marks, but they just wouldn't show up.  (I need to work on my picture taking skills some more)
 I got to work sanding this little baby.  As I was sanding, I was overcome with the strong scent of powder or perfume.  The previous owner must have stored it in the bathroom or closet where she applied powder or heavy perfume.  It was bad!  After the sanding was complete, I quickly primed it to cover up the horrible smell!  The primer did not cover the smell, so I said a little prayer and started painting.  Thankfully, the paint killed the scent.  I let the paint fully cure for a week, and went shopping for some yummy scrapbook paper. 

Once the paint was cured, I set to work with my paper cutter and Mod Podge.  And this little lovely emerged on the other side of my crafting storm!
It is perfect for my toiletries stockpile.  This is what is looks like loaded up.  Yes, I know I have a ton of shampoo, I am the crazy coupon lady and got it all almost free!


Every time I walk into my closet, I get to look at something pretty :)  What a great way to start each day.

This project was entered into The CSI Project's Mod Podge Challenge
Visit thecsiproject.com

Friday, August 6, 2010

Play Dough

When I was a child, my mom always made our play dough.  We very rarely had the store bought stuff.  I thought it was the best to be able to play with the warm dough, and when we had mashed all the colors together, or it dried out, Mom would make fresh dough.  Now that I have my own kids, I love making play dough.  I also love that I know exactly what goes into it and don't have worry when it goes into my daughter's mouth because everything is completely edible!  There are countless ways to make play dough, but this is how we always made it:

 Ingredients
2 cups flour
1/2 cup salt
3 tbsp Cream of Tartar
2 tbsp Cooking Oil
2 cups Water
Food Coloring as desired


Instructions
Combine all ingredients (except food coloring) in a medium saucepan. 
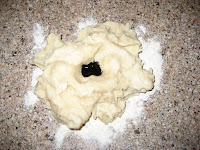
Cook, stirring constantly, over medium heat until the consistency of mashed potatoes (see photo below)


Move dough to a floured surface (I put it directly on my counter) and cool slightly
Knead until smooth and elastic.
Add food coloring as desired.  If you are only doing one color,  you can add it before kneading.  Note:  It will take a lot of food coloring if you want a dark color.  The dough we made this week was at least 30 drops of blue and about 6 drops of green. 
Store in Ziploc bags after completely cool. (Don't put it away until completely cool, or you risk the condensation making your dough too wet, and it will get moldy!)
This is always a hit with the kids and it lasts a long time as long as you are sure to put it back in the Ziploc bag when you are done playing. 
My 5 year old was nice enough to stop playing for a second so I could snap this picture :)


Visit thecsiproject.com

Tuesday, August 3, 2010

Upholstered Headboard

No bedroom is complete without something pretty at the head of the bed.  In every bedroom I have ever had, there has always been something at the head of my bed.  Sometimes it was a headboard, others it was the fancy hat collection arranged on the wall above the bed.  My 5 year old daughter has a huge castle sticker at the head of her bed.  So when my husband and I painted our bedroom a deep chocolate brown, I knew I had to find something to complete the look.  The problem was, I couldn't find anything that looked right. 

One afternoon, I was walking through my local fabric store and discovered my inspiration in the aisles.   Because my bedspread has a floral pattern, I did not want anything that would compete with it.  I found this great stitched design and I was off and running.


I don't have any pictures of how I made this, but it could not have been any more simple...
*  Buy the cheapest piece of wood you can find at your home improvement store (tip:  Make sure it will fit in your car BEFORE you get it cut...I ended up cramming it in my car along with the help of a very nice construction worker who happened by me in the parking lot) 
*  Figure out how padded you want your headboard to be.  I used 2 layers of the cheapest batting I could find.  Staple it to your board starting with the middle and working to the ends.  A staple gun is helpful here.
*  Arrange your fabric and staple over the batting.
*  Cut a 2x4 on a 45 degree angle.  Screw one side of the 2x4 to the wall and the other side to the back of your headboard. (You can also attach legs to your headboard so it stands on the floor.)
*  Step back and admire your handiwork!  Easy peasy and, depending on the cost of your fabric, pretty inexpensive :)

Now all I need is the perfect little something just above the headboard.  Only time will tell what that will be :)

This project has been entered in:
Visit thecsiproject.com

Sunday, August 1, 2010

Vinyl Wall Art

I know I have been MIA for the last few weeks.  My computer crashed and I haven't been able to access any of my pictures or anything else for that matter.  I won't be able to show you many of my latest projects because all the before pictures are on the computer that crashed.  We are still trying to decide what to do about the computer.

In the meantime, here is a little something I created for my son's room.  His walls are a yummy sky blue to match the blue parts of his Winnie the Pooh bedding set.  The problem is that the only things hanging on the wall are the comforter, which I added ribbon to so it hangs on the wall (I have never used the comforter with my baby!)  The other thing is a super cute Winnie the Pooh sign my mom made when the baby was born.  I adore the book "Guess How Much I Love You" by Sam McBratney.  In fact, it may be my favorite children's book.  My favorite part is the last line, "I love you to the moon and back."  Thus, my inspiration for wall art was born.  Yes, I have seen these kinds of signs all over the place, but I didn't want to just buy something else that would only be used for a little while.  I broke out the Cricut and cut the letters using the Keystone cartridge.  The moon and stars are made using George.  I used vinyl and stuck it directly to the wall.  I love the way it turned out.  What do you think?
I learned several things about making vinyl wall art while doing this project:.
1.  It helps to do a test run with inexpensive printer paper before committing to the more expensive vinyl.
2.  When using transfer paper, the top is VERY sticky, EVERYTHING (especially animal hair) sticks to it, so be very careful where you place it while you are working!
3.  My transfer paper had guidelines on the back of the working surface.  Not very helpful if you can't see them!  I put sheets of white paper underneath my project, then I could see the grid perfectly
4.  The letters do not like to stay put when you are trying to put the sticky side over them, I used very small pieces of masking tape to temporarily tape them to the backing so they would not move while I adhered the transfer tape.
5.  A level is very helpful when determining the position on the wall (laser levels are even better!).
Burnishing to the wall
6.  Burnish, burnish, burnish....then burnish some more.  To the transfer tape, then to the wall.  When you think you have burnished enough, do it some more,  it will make your project go much more smoothly.  The vinyl will not stretch if everything is burnished correctly.
Related Posts with Thumbnails
 
Designed by Lena Graphics by Melany