Showing posts with label gardening. Show all posts

Wednesday, April 20, 2011

Adventures in Gardening

Last year, I ventured into the world of vegetable gardening.  I wasn't too successful, only getting a few green beans for all my hard work.  This year, I am determined to do better and actually get more than 2 meals worth of vegetables!  I made a few changes to last year's plan and got started last month.

My husband found this little upside down planter on clearance at the end of the season last year.  It has rosemary, parsley and basil on the top.  Planted in the holes on the bottom are tomatoes and strawberries.

 Last year, I used a pot for my potatoes, I didn't get any edible ones.  This year, I went for a different variety and also used kitty litter containers with the bottom cut off.  There are 4 plants in each container.  As they grew, I added dirt to cover the plants until they reached the top of the containers.

These little plants were in the soil from last year.  I am pretty sure they are green beans since they are in the same spot I planted them last year, and now the leaves are looking like green beans.  I hope I am right!

One month later, the herbs and tomato plant are still thriving.  I even have a tomato growing, and have used the herbs to cook with.  The strawberry plant is all but dead.  Back to the drawing board on that one!
 As you can see, the potatoes (in the yellow containers) and green beans are doing great!  I bought a tomato cage that unfolds and is perfect for supporting the green beans as they grow.  I have also planted peas and carrots in the open space.  There is still room in the center for something else.  I am not sure what I will plant there, if anything.  Last year, I also planted pumpkins, which completely overtook the small garden space I have, then the vine was inundated with bugs and died!  This year, I am trying to start the pumpkins in the blue container in the grass to the left.  There is plenty of room for them to spill out of the container and grow to their heart's content in the grass.  We are hoping to use these for our Halloween pumpkins *fingers crossed*!
 Last but not least, this is my lemon bush.  I have had her for 2 years and she has yet to produce any lemons.  She looks MUCH healthier and happier this year, so hopefully we will see something good soon.

At the beginning of the year, I got sucked in by the Arbor Day Foundation.  I sent them some money, and they sent me 12 "trees".  Now I had done some research, so I knew I would be getting "sticks" and not "trees".  When they arrived, my husband laughed and said "Honey, we have tree mail."  I opened my tree mail and had a good laugh when we looked at a bag of 12 sticks.  I really should have taken a picture of them, it was quite priceless.  Flash forward about a week when I finally had time to plant my sticks.  I started to dig my first hole, and realized that there was no way I was going to dig 12 holes in our horrible hard, rocky, clay soil!  I got one good hole in the ground and gave up.  I only had 3 pots laying around, so only 4 "trees" were planted.  The rest were given away to friends or tossed in the trash.  Here are my 4 sticks in all their glory...

This is how my trees looked this morning.  Still sticks, but now they are sticks with leaves (which are really hard to see in this picture because the grass is finally growing back).  Two of the trees have some sort of bug which is eating perfect half circles out of the leaves.  I have to do some research on how to get rid of them and not hurt my precious babies in the process!

I can't wait until I can start eating my veggies this year.  There is something so satisfying in eating something you planted and grew in your own yard, don't you think?

Wednesday, May 26, 2010

Teacher Thank You Gift


My oldest daughter graduated from preschool this year.  I wanted to do something different for her teacher because everyone always does the same things, and really, how many "teacher" things can one person have?  Needless to say, I was excited to see this Chalkboard Planter over on The Crafters Filebox.  I thought it was the cutest idea, and with a few changes, we came up with the planter above.  It was easy-peasy, completely done with spray paint! 

After the pot was dry, I took my daughter to the local home improvement store to pick out the plant (that is why it looks a bit sad...she always picks the sad flowers, I think she feels sorry for them).  Then we traced her hand on cardstock and glued 2 pieces together to make the pick.  I wrote a message on the front, and she colored a picture for her teacher on the back.  We gave it to her teacher on the last day of school, and she loved it!

These are so versatile.  Because the pot is sealed before you start the project, they should last, and would be great for growing herbs or other small plants.  The chalkboard paint makes it easy to label, and to change the labels when you change the plants.

Thursday, April 15, 2010

Grass-a-pillars

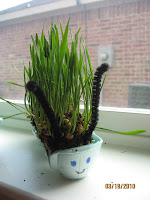
A few weeks before Easter, we made Grassapillars. I got the idea from Family Fun magazine, and added my own touches. They were super easy and lots of fun to make.
 
Here is my version of the instructions:

1.  Cut an egg carton into quarters (3 sections each), and trim the edges so they all appear even.
2.  Draw smiley faces and eyes on each carton quarter.
3.  Mix 1 cup - 1 1/2 cups potting soil with 4 tablespoons winter wheat berries. (You can also use grass seed, but it only comes in HUGE bags, and we only needed a little bit, so I bought winter wheat berries from the bulk foods area in my local grocery store.)
4.  Moisten the mix and scoop into the egg carton sections.
5.  Pat down the soil mixture firmly into each cup.
6.  Add pipe cleaners for the antennae.
7.  Set in a sunny window. The grass will begin to sprout in about a week.
8.  Don't forget to water your new friends.

Here is the picture of the family of grassapillars we created. It was great fun watching them grow, and a great lesson in growing things for my little one :)
Related Posts with Thumbnails
 
Designed by Lena Graphics by Melany