Saturday, June 26, 2010

Spongy Clock

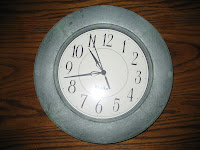
I am always amazed at what a little bit of paint and some paper towels can do.  My mom recently repainted her kitchen a pretty blue.  The problem was, she had this ugly green plastic clock hanging on the wall.  She didn't want to buy a new clock, and the only way to fix it was paint.  Unfortunately, I forgot to take the before picture before I sanded the clock, so you don't get the full effect of what it looked like, but you can get a general idea, it was plain and boring (and looked horrible against her new blue wall).

After taking everything apart, I fully sanded the frame of the clock (then took the before picture above...oops).   Because it was plastic, I gave it a quick coat of primer.  I let the primer completely dry, then came 2 coats of dark blue.  Being cheap frugal, I didn't want buy anything for this project so I used paper towels to sponge the wall color and white all over the clock frame.  And voila...beautiful cheap frugal clock.

I hope you enjoy your new clock mom :)

Wednesday, June 16, 2010

Dollar Store Thank You Card

I just love the wonderful ladies at The CSI Project.  This week's challenge is Dollar Store projects.  As I wandered through the aisles at the Dollar Tree, I was inspired when I walked past the flowers.  My mom sent me the greatest card with a flower and tulle on the front for Mother's Day.  I knew I couldn't do the same thing, but could do something quite similar with dollar store items.  I picked a bunch that had a different colored flowers so I would get the most bang for my buck.  Then, I wanted over to the wedding section for the tulle.  When I got home, I assembled my materials...
I yanked plucked a yellow flower from the bunch, cut a small hunk carefully measured and cut the right amount of tulle and set to work gluing it to the front of the card.  While the glue was drying, I used my Cricut machine to cut a circle for the center of the flower, inked my "Thanks" stamp in black and slapped centered it on the circle.  Once the glue from the flower was dry, I used double sided tape to stick the circle to the flower, and voila....cute Dollar Store Thank You Card.
Just imagine the possibilities of what can go in the center of this flower...As limitless as my stamp collection :)


Visit thecsiproject.com

Thursday, June 10, 2010

Recycled Fish


I just love projects that allow me to use items I already have in my stash, as well as recycle things that would likely be thrown in the trash.  This cute kids craft from Family Fun utilizes both of these elements.  It was also great fun making with my 5 year old daughter. 

To make these projects you will need everything pictured below.  The small water bottle is optional (we did not use them in our fish)

To get started, you will need to cut the bottom of the soda bottle off.  I drew on the bottle first with a permanent marker before attacking with my scissors.  Once the bottom is cut off, use the masking tape to close the opening.  If you want top or side fins, cut your water bottle and secure the pieces with masking tape.  Tape a length of fishing line to your bottle (you can also use string or whatever you have on hand).  Make sure you tape it well, I didn't and then had to retape during the paper mache process. Now it's time to get messy.  You can use Mod Podge, but thinned cheap white glue works just as well.  It took 2 layers to completely cover the fish.

After your paper mache is completely dry (we let ours dry over night) you can start painting.  We used a milk jug lid cut in half for behind the eye and a silver twist tie for the mouth.

Here are our new pets in all their glory.  Mine is one looking left and my DD's fish is the one looking to the right.  They are a great addition to our playroom.

Thursday, June 3, 2010

New Family Room

We have been very slowly repainting our boring builder's white walls throughout the house.  I have finished the master and kids bedrooms and now am moving to the other rooms in the house.  Our adventure for Memorial Day weekend was repainting the Family Room.  Here is the before picture. 

See how the pictures and curtains just blend right into the walls? Yuck! I have been living with this for two years before I finally pulled the trigger and selected a color. Of course, I agonized about which color to use because we spend the most time in this room, and I wanted to make sure I loved the color. Plus, it had to be fairly neutral since we will eventually get rid of our horrible couches (they are so old and stained, I wouldn't dare even picture them in public!). Anyway, I digress.  I looked at several swatches and finally chose Adobe Straw from Behr (my favorite brand). 

First thing on Saturday morning, we took the kiddos over to Grandma and Grandpa and started taping.  It is such a tedious process, but makes the painting so much easier since we don't have to worry about being perfect.  I don't know what it is, but I just love a room framed in blue tape, don't you?

After the taping was complete, we primed all the walls.  This isn't something I usually do, but I have found that these walls just suck up the paint since they were only sprayed by the builder.  Primer helps the color cover walls while using less of the more expensive high quality paint.  Since I was using a fairly light color, I did not tint the primer.  Here it what the wall looks like all primed and ready for color.


And 24 hours later.....voila....

My brand new family room.  I just love how the pictures and the curtains pop off the walls now.  It looks like the tile around the fireplace blends in, but it really doesn't.  The room is still a work in progress. I need something more on the main wall, all I have right now is a TV and speakers (you can see one of them in the top left of the picture).  I am waiting for inspiration to strike me with the perfect thing to hang on the wall.  In the meantime, here are the before and after pictures side-by-side.


Ahhhh, so much warmer and more welcoming now.

Thursday, May 27, 2010

Mother's Day Cards

I recently got a Cricut machine.  Oh wow, is it ever a great machine!  I have tons of great ideas of things I can do with it.  However, my pocketbook vastly limits these possibilities.  As you are aware, the cartridges are pretty expensive, so I only have 3 of them.  These Mother's Day cards were created using the Jasmine and Home Decor Solutions cartridges.  For the first two cards, I used photos from a recent trip with the kiddos to see the wildflowers (please excuse the blurred images, but I have a strict policy of not letting the kids pictures be on this blog). 
 

For this card, I used tiny colored brads to hold the letters, they are not glued down which makes them loose, and gives a fun whimsical look.
These last two cards were from the kids.  They are two variations on the same idea.
For all these cards, I make a full sized insert with the sayings printed on my computer.  Needless to say, everyone loved their cards, and I had a great time making them and learning about my new Cricut machine.  I can't wait to save up enough money to purchase more cartridges...

Wednesday, May 26, 2010

Teacher Thank You Gift


My oldest daughter graduated from preschool this year.  I wanted to do something different for her teacher because everyone always does the same things, and really, how many "teacher" things can one person have?  Needless to say, I was excited to see this Chalkboard Planter over on The Crafters Filebox.  I thought it was the cutest idea, and with a few changes, we came up with the planter above.  It was easy-peasy, completely done with spray paint! 

After the pot was dry, I took my daughter to the local home improvement store to pick out the plant (that is why it looks a bit sad...she always picks the sad flowers, I think she feels sorry for them).  Then we traced her hand on cardstock and glued 2 pieces together to make the pick.  I wrote a message on the front, and she colored a picture for her teacher on the back.  We gave it to her teacher on the last day of school, and she loved it!

These are so versatile.  Because the pot is sealed before you start the project, they should last, and would be great for growing herbs or other small plants.  The chalkboard paint makes it easy to label, and to change the labels when you change the plants.

Wednesday, May 5, 2010

Stained Glass with Gelatin

Yes that is right, I said stained glass with GELATIN!  I saw these super easy and fun stained glass shapes in the April issue of Family Fun.  They could not have been any easier to make, and they were great fun with my 5 year old daughter.  The (simplified) instructions from Family Fun were as follows:
1.  Boil 3 tablespoons water.
2.  Add 1 envelope unflavored gelatin and a few drops of food coloring
3.  Stir slowly until combined (if you stir too fast, you will get air bubbles)
4.  Pour mixture onto a 9-inch plastic plate (we used a paper plate covered with plastic wrap, it created some wrinkles, but they added interest)
5.  Sprinkle with glitter, if desired
6.  Set aside until completely dry
7.  Once dry, cut into desired shapes (we only got 1 shape per plate, because the edges were pretty thin)
8.  Poke a hole at the top and hang in a window with fishing wire (or ribbon ,or string, or whatever you have around the house)
9.  Step back and enjoy your handiwork :)

Some other notes: 
*  Make sure you do not remove your stained glass from the plate until it is completely dry.  If you remove it too soon, it will stick to EVERYTHING and will not be easy to cut.  You will know it is done when it is like hard plastic.  It took a couple of days for ours to completely harden.
*  If you find that your stained glass curls, put it between 2 pieces of parchment paper and put it under something heavy (we used a case of paper, nothing else seemed to work for us)

Here is what they looked like close up:
Related Posts with Thumbnails
 
Designed by Lena Graphics by Melany